Add an employee
Step 1 – On the admin panel, click on in the sidebar menu
Step 2 – Click on the button in the top right corner
Step 3 – Fill up the following fields
- First Name
- Last Name
- Password
- Choose the password or click on the button to automatically generate one
- Group
- Optional
- The employee will automatically inherit the settings from this group
- Default Zone
- Optional
- This is the zone that will be selected by default in the employee’s account
- Primary Vehicle
- Optional (only required if using Ronspot for parking)
- This is the employee’s car plate (this can be set later by the employees from their account)
- Notify user By Email
- Tick the option
Step 4 – Click on
Bulk import of employees
Step 1 – On the admin panel, click on in the sidebar menu
Step 2 – Click on the button in the top right corner
Step 3 – Configure the following fields:
- Notify employees by email:
- : imported employees will be automatically notified that an account has been created for them
- : imported employees won’t receive any email notification about the import
- Automatically generate passwords
- : a random password will be automatically created and sent to the imported employees
- : no password will be automatically generated (you can set a password manually in the CSV file)
-
- Active: imported employees will be able to login straight away after the import
- Inactive: imported employees won’t be able to login until their account is manually activated
Step 4 – Click on the link Download Sample File to create your CSV file. Your file must be as follows:
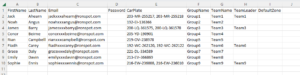
- CSV format, note: the column names in the header/first row must match the names below.
- Column A: FirstName
- Column B: LastName
- Column C: Email
- Column D: Password
- optional—leave blank if not needed
- if the option “Automatically generate passwords” is selected, this column will be ignored
- Column E: CarPlate
- optional—leave blank if not needed
- type the vehicle registration plate (use commas to add more than one)
- Column F: GroupName
- optional—leave blank if not needed
- type the name of an existing group to automatically add this employee to the group
- Column G: TeamName
- optional—leave blank if not needed
- type the name of an existing team to automatically add this employee to the team
- Column H: TeamLeader
- optional—leave blank if not needed
- type the name of an existing team to make this employee a leader of this team
- Column I: DefaultZone
- optional—leave blank if not needed
- type the name of an existing zone to display this zone by default on the employee’s account
Notes: when saving your file, please choose CSV UTF-8 (Comma-delimited) (.csv) instead of regular Comma-separated Values (.csv) to escape accented characters correctly
Step 5 – Click on and select your CSV file
Step 6 – Click on the button
Step 7 – On the next page, tick the users you wish to import
- This is a preview page, it evaluates each row and value in your CSV file, no employees have been imported into the Ronspot System at this point.
- You can cancel if you want to re-edit your CSV file to fix issues – click the in the top right corner.
- Rows with a green colour have valid values, by default these rows are selected with the checkbox in the first column and will be imported when you click the button at the top of the grid.
- Other rows are invalid, an error message will be shown in the Status column indicating what was invalid and why.
- These rows cannot be selected and will not be imported if you take the next step and click the button.
- If you have invalid rows:
- Decide whether it easier for you to go back and edit your CSV file and re-attempt full upload OR …
- Proceed and import the currently selected rows and either add the remaining rows in a separate CSV file or add them one by one.
Step 8 – Then click on the button.
- Please note that it can take some time for the new employees to be imported into the Ronspot System.
- You can monitor the progress by clicking the button on the .